Fill Flash
 The soft golden sunlight that occours all too briefly early and late in the day is undoubtedly the best for photography. However to photograph only in 'good' light is pretty limiting. In mid-winter it is not so bad as a low sun angle means that viable light lasts for an hour or two at each end of the day. But in summer the sun seems to zoom up from the horizon and even an hour after sunrise the light is already too harsh for quality photography.
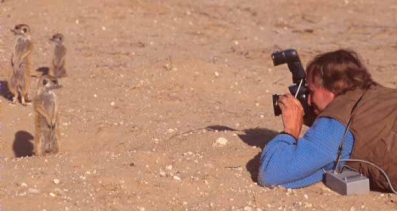
Fill flash is a wonderful technique that allows the photographer to take great pictures even when natural light has become quite harsh. A controlled amount of flash is added to the natural light and thus greatly improves the appearance of the image by filling in shadows and reducing contrast. The key to using flash and natural light together is to keep the flash subtle. When a photograph looks like it has obviously been taken with flash then too much light has been added. The idea is to use only the absolute minimum of flash required to correct excessive contrast and shadows. Overdo it and pictures soon start to look artificial and rather ghastly. Most modern flash systems work 'through the lens' (TTL), in other words the camera's internal meter measures the amount of flash light being reflected back from the subject and switches off the flash when the required exposure has been achieved. The photographer has the option to control how much light is added by dialing in under or over exposure for the flash. By the way, it is a very good idea to read the camera and flash manuals thoroughly before venturing on a field trip. The procedure for making flash exposure compensation varies with different models as well as makes. In some systems the compensation is made on the flash while in others flash compensation is dialed into the camera itself. Trying to figure out how all this works with a rare bird in front of you is sure to be a frustrating experience. Knowing how much flash to add is a bit tricky and depends on how harsh the sunlight is at the time. When the light has become fairly harsh, such as mid morning and afternoon, I generally dial in between minus one and a half stops or minus two stops compensation into the flash. This corrects unwanted shadows and contrast without giving the picture an overly flashed artificial appearance. At noon with a blazing sun directly overhead rather more flash is required, often as much as minus one stop fill. Admittedly the fact that quite a lot of flash has been added is then quite noticeable, but as a rule the pictures look a great deal better than if only natural light had been used. In any case, mid-day sun is an almost impossible time to take photographs. At least by using a fairly heavy amount of fill it is possible to salvage something usable from the situation. As well as fixing contrast and shadows in harsh sunlight, fill flash can also greatly improve the appearance of a photograph in other less than ideal lighting situations. On an overcast day pictures often look dull and flat. Adding just a tiny amount of fill can lift the image and give sparkle and texture to the subject. In overcast situations I set my flash to minus two or even minus two and a half stops, anything more tends to look like overkill. It is important to remember that if a flash is used on the camera hot shoe there is a good chance of getting pictures with the dreaded 'red eye'. Red eye is often seen on family portraits when using the little pop up flash built into many 'point and shoot' cameras. In bird photography the large eyes of nocturnal species are particularly susceptible to this. The only way to avoid red eye is to use a dedicated connecting cable and move the flash a meter or so either side of the camera. This prevents the light from the flash entering the subject's eye and reflecting directly back through the camera lens. Using off-camera flash is easy when working from a vehicle. I generally photograph from the front and simply point the flash out of the back window. However in a small hide off-camera flash becomes rather cumbersome as it is necessary to set up a separate tripod just outside the hide to hold the flash. A limiting factor in bird photography is that it is often impossible to get close enough to the subject to be within the workable range of even the most powerful flash systems. Worse still a flash used outside has a much shorter range than indoors where light can bounce off ceilings and walls. Fortunately tele-flash attachments are available which increase range by concentrating the flash beam, and are rather like putting a big magnifying glass in front of the flash. The models I have tried are marketed in The States as the Project-a-Flash made by George Lepp, and the Visual Echoes Flash Extender from Kirk Enterprises. These can be difficult to obtain in South Africa so it helps to have a friend over there, although luckily these flash extenders are not expensive and are light to post. For Metz flash users a tele extender is available in this country which fits the Metz 60 range. I have used the Metz tele-flash attachment for many years. Whilst the light gain is not as great as the Lepp and Kirk products, the beam is less narrow and so does not have to be as accurately directed which is helpful when tracking a moving subject. Whilst fill flash is not an easy technique to master, it greatly extends the time for viable photography and therefore is well worth the trouble. I just find that it interrupts my usual routine of a mid-day snooze on a field trip when the light is 'bad'. Now with fill flash it is possible to take good pictures right through the day and I do not have an excuse for a break at all! Top | Previous | Next | Tips Home | Stock Images | Books | Tips | Gallery | FAQ's | Kruger Park | Contact Text and photographs © Nigel Dennis |